We've recently started using the new release of QGroundControl for the hand controller and computer. In order to fully utilize the new features included with that release, we have updated Discovery's onboard software. Now you can use Terrain Following and Mission Continuation to improve your workflow and increase data collection efficiency.
Terrain Following
Terrain Following is...
Terrain following refers to the ability of an aircraft to maintain a relatively constant altitude above ground level. When you use terrain following for a flight mission, the software will utilize elevation data to calculate flight altitude, rather than using one set altitude based on the launch position.
Terrain Following is not...
Terrain following is not a substitute or alternative for obstacle avoidance, and it is not to be used as a replacement for the Pilot-in-Command or Visual Observers. ALWAYS follow FAA Guidelines.
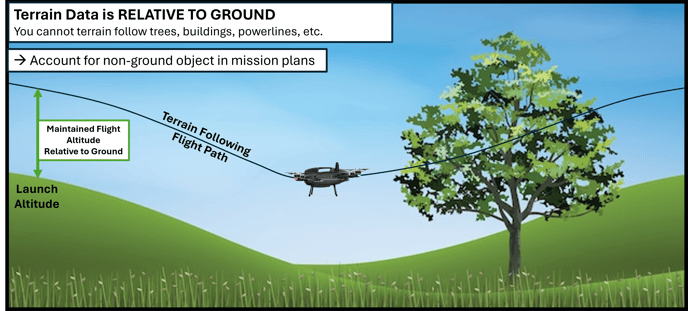
Terrain data is based on GROUND ELEVATION
The drone will not see or climb over trees or other obstacles
Using Terrain Following...
Using this feature is beneficial in areas with significant terrain variation such as large rolling hills, mountains, cliffs, etc.
Using Terrain Following can help you achieve consistent LiDAR point density and camera GSD throughout a jobsight.
LiDAR Range
LiDAR sensors have a specified max range (distance from sensor to target) at which they can sufficiently capture a ground point. Therefore, it's important not to fly the drone at an altitude greater than that max.
Discovery 2 - Max distance from sensor to ground = 60 meters
Discovery 3 - Max distance from sensor to ground = 90 meters
Camera Range
If you are going to produce an orthomosaic for the job, you will want to set your flight altitude to meet your camera GSD requirements. Use the formulas below to determine the flight altitude you will need to set in order to achieve your required GSD.
Estimated GSD (cm/pixel) = Altitude x 0.02875
Estimated GSD (in/pixel) = Altitude x 0.0113
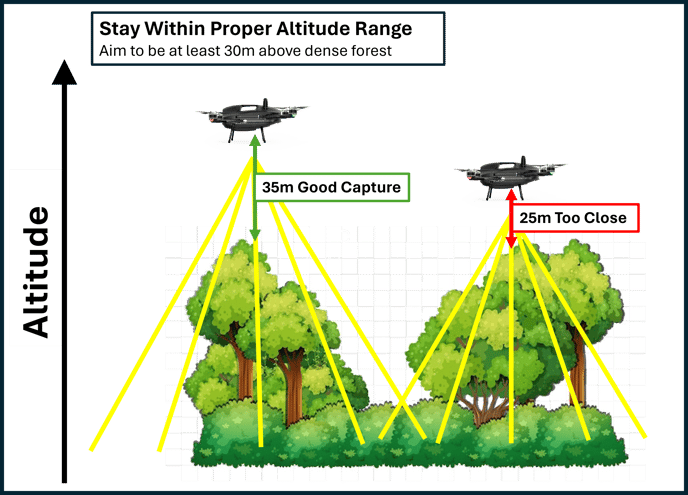
Lastly, consider the optimal camera range. Orthomosaic processing performs best when images can capture variations. These variations are used to align the images to create an orthomosaic.
If you are too close to objects that have very little variation (ie. dense forest or plain desert), your processing software may have difficulty understanding how to knit images together.
Maintain Distance Between Sensors & Ground
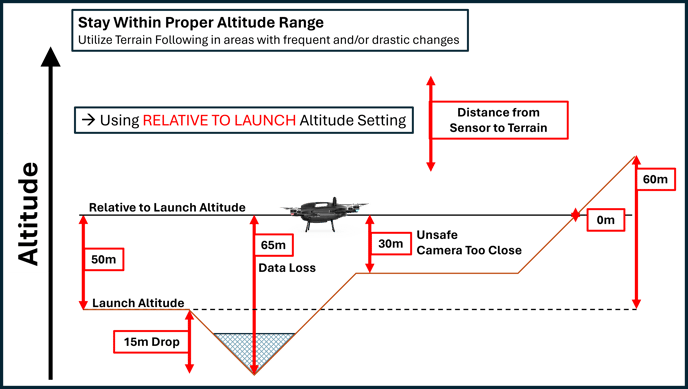
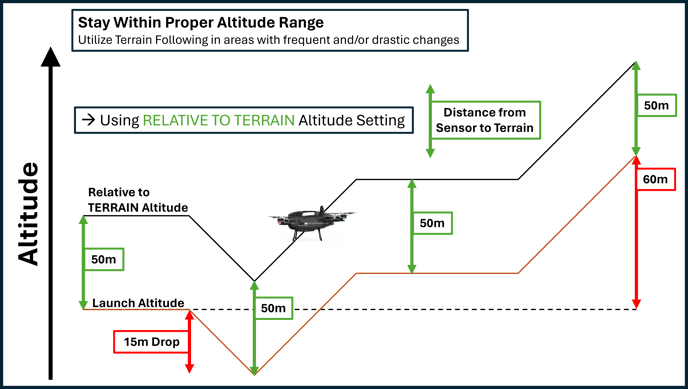
Now that you have determined your optimal altitude for the jobsite, you can use terrain following to set the drone to follow the contour of the terrain, so you can maintain the distance from the sensors to the ground. The images below illustrate how terrain following solves issues related to sensor proximity to scanned objects.
Precautions for Using Terrain Following
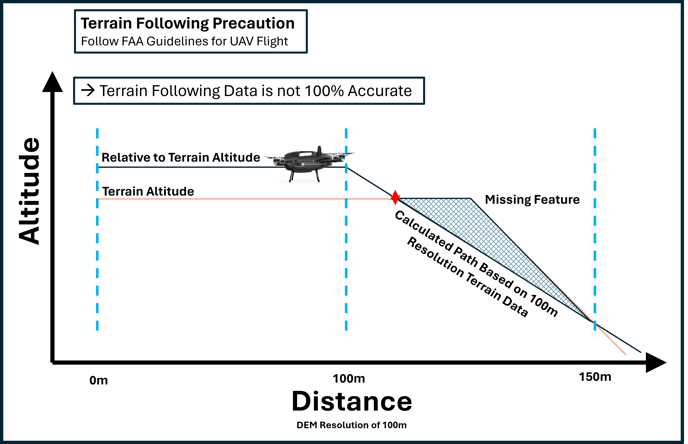
Terrain data is not 100% accurate: The data comes from an array of sources, some of the sources may not be completely up-to-date, and some sources have a broad resolution of 100 meters. Therefore, the terrain at your jobsite can vary from what your drone is programmed to follow.
Terrain Following is only Enabled Along the Mission Path: The drone will only follow terrain along the mission path. It will not follow terrain on its way to the mission path, and it will not follow terrain on its way home. Here are some images to help you understand when the drone will and will not follow terrain.

Varying RTL Altitudes: When the drone returns home, if it is below the HOME position (where the vehicle was armed), it will climb to 15 meters above home and return. If it is already 15 meter or more above the home position, it will maintain its current altitude while returning to the launch point.

Plan Terrain Following Missions Efficiently
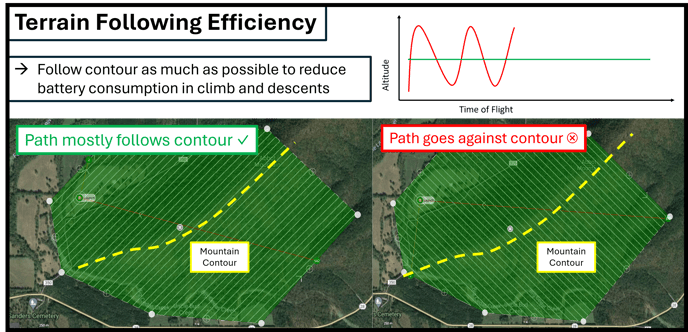
Follow Terrain Contour: Any time the drone climbs or descends, it consumes battery power at a faster rate than when it is simply maintaining altitude. For this reason, if your site has mostly flat terrain, you can continue to fly with a fixed altitude for maximum efficiency.
When you opt to use terrain following, planning along the terrain contour rather than against it will result in more efficient use of battery resources by reducing climbs and descents.
NOTE: Currently, you can not plan missions to "refly @ 90 degrees" when using terrain following. In order to perform a flight at a separate angle, you will need to plan a separate mission.
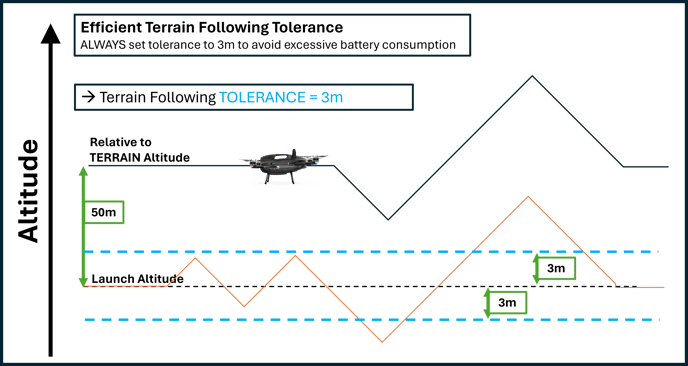
Set the Following Tolerance: Setting the tolerance makes terrain following flights more efficient. The drone will only climb or descend if the change in terrain altitude is more than the tolerance.
This can reduce climbs and descents, therefore reducing battery consumption. Consider that this will affect your sensor distance to ground.
ALWAYS set the tolerance to 3m!
Leaving tolerance at 0m can cause excessive battery consumption
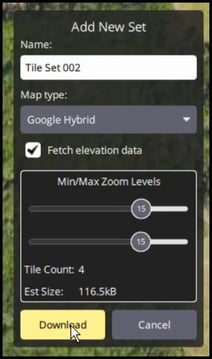
Download Map Tiles with an Internet Connection: Be sure to
Be sure to download map tiles and "Fetch Elevation Data" while connected to internet. This elevation data is necessary for terrain following, and will not be accessible if you don't have an internet connection available.
Don't rely on your cellular hotspot to retrieve map tiles in the field. The hand controller does not function well with 5g wifi. Therefore, if you need to plan in the field, it is always best to have these tiles saved to the hand controller.
NOTE: you will not be able to download map tiles on the hand controller over a public wifi connection that requires verification within a popup or internet browser. There herelink hand controller does not have the capability to perform the secondary verification. You will need to connect to a secured network with a password.
Planning Missions Using Terrain Following
Follow this process to plan your flight missions using terrain following. See the video below demonstrating the mission planning process when using terrain following.
- Plan the mission as before setting your altitude and path
- Once complete, with the path click the "Terrain" tab (mountains icon)
- Click the dropdown to select the "Altitude Mode"
- Select "Calculated Above Terrain"
- Set the tolerance to 3 meters
- Review the bottom of the screen to ensure that the orange flight line stays comfortably above the green terrain line
- During upload of the mission, you may see additional waypoints used to adjust altitude above terrain by specifying climbs and descents
Terrain Following lesson complete! Now let's talk about Mission Continuation...
Mission Continuation
With the release of the 3.1 software, you can now plan your entire jobsite in one mission! When the drone battery runs low, it will return to launch. The software will then adjust the mission to pick up where it left off. Therefore, you will not have to plan several missions in order to collect data for a large site.
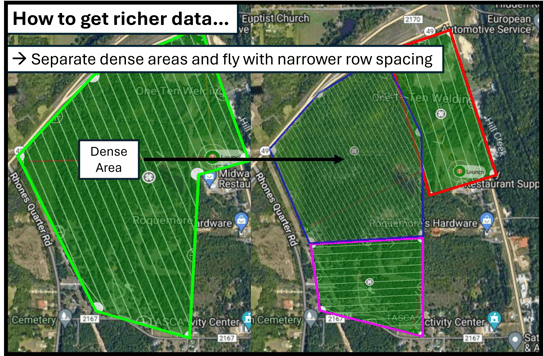
Note: You can still plan separate missions if you need to set different parameters for specific areas. For example, if you have a job that has a section of dense forest, but is mostly clear of trees and brush, you can plan the dense area with tighter row spacing and/or lower altitude in order to gather more ground points.
See this video demonstrating the in-field process when
using mission continuation and terrain following
When the drone RTL's in the middle of a mission:
- You will see a message on the hand controller, "Mission Continuation Updated". This message lets you know that the software has already prepared the next mission to begin at the RTL point
- You will then see "Starting Mission Copy", which indicates that the collected data is now being copied to the SD card
Note: For each flight, data collection begins at the first calibration point and ends on RTL or mission completion. The folder is then copied over to the SD card while the drone is returning to launch. Your next data collection will go into a new folder, beginning at the first calibration point of the that mission and ending on RTL.
So your mission folders will look like this:
SD_Mission_YYMMDDHHMM_01
SD_Mission_YYMMDDHHMM_02 and so on…
- Then you will see "Mission Copy Complete", which tells you all data has been successfully copied to the sd card
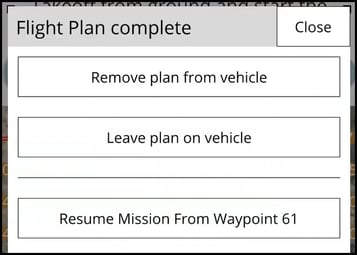
- Lastly, you will see a popup window asking for you to specify a choice. Click "Close" to close the window.
If you press any of the options other than "Close", the SmartDrone calibrations will be bypassed, next mission will start at the following waypoint, not the RTL position
When the drone lands, you will follow these steps to launch for the next mission:
- Power down the drone by removing both batteries and replacing them with a fresh set
- Power on the drone and perform the usual pre-flight checks
- Return to a safe distance from the drone
- Wait for QGC to reconnect
- Click "File", then "Download" to see the modified mission and added calibration points
- Wait for the warm up timers and slide to takeoff and continue the mission
Happy Flying!
You're now on your way to implementing these workflow improvements and streamlining your data collection process. See you next time...